In Episerver 7.5 and above, a new feature was released called display options. Display options allow content editors to change the widths of blocks and pages partials within the CMS dynamically. in this tutorial, you will learn how to enable them on your site. In my last article Partial View Controllers Explained, I briefly covered this topic. In this post, I'm going to dig a bit deeper under the covers and explain how you can enable display options in your site. If you want to do this in your project, read on 🔥🔥🔥
Why Use Display Options?
One of the benefits of allowing content editors to drop a block or a page within a content area is that they will have a lot of power and flexibility over the page layout. In early CMS systems, companies were given a template that defined a pre-determine page layout and content editors had very few options when it came to changing things. This workflow was not efficient. If an editor wanted to move a component on the page from the left-hand side to the right-hand side, it would usually involve a code change and redeploy. In some companies that process could take weeks or even months. Since Episerver 7.5 this issue has been solved. With the additions of blocks and display options, fixed layouts are dead 💀.
This gives a lot more power to the content editors. Now they can decide what blocks should be displayed on a page, in what order blocks should appear and also the width the block should render as well. This extra flexibility naturally comes with more technical complexity. Your codebase gets slightly more complex. Your CSS gets more complex, as this pattern will only work within a dynamic grid. Your testing is also more complex as the site will contain more permutations to test. Despite all this, display options still rock 🤘 Read on to learn how to use them 🔥🔥🔥
How Display Options Work?
In today's tutorial, I will go over the code required to enable display options in your site. Once enabled, you should see something similar within your editor:
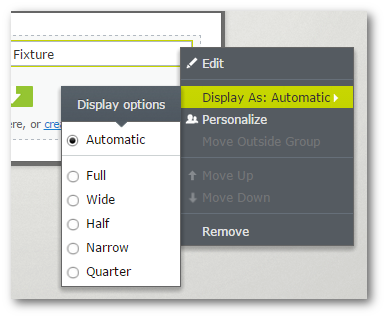
In the editor when a user sets a display option, a tag property is stored against that block or page partial in the database. This tag can later be accessed in one of a few ways. A partial controller or a block controller are the main techniques in Episerver to intercept a component render request. Regardless of the approach, you will end up in a controller. Within the controller, you have two options on how to use the Tag property. First, you could create a single view and pass the Tag into the view. Based on the Tag, you can update the CSS class to alter the width of the component. The second approach is to create a new view per tag. For example, you could create a view for each of these options:
- Full Width
- Two Thirds
- Half-Width
- One Third
- One Fourth
In this tutorial, I will assume the latter as it's easy to cover, however, do what makes you happy!
How To Render Blocks At Different Sizes
To enable display options you will need to create an InitializationModule. This will load when the CMS is started and it will define the display options. I usually call my module something like DisplayRegistryInitialization. Feel free to rename it as you want as the name is not important. In this tutorial, I am going to register 5 display options for our site and the code to do this will look like this:
The DisplayOptionTags class is defined below. As you can see it maps to classes that relate to Bootstrap grid CSS:
This is all the code required to enable display options in Episerver, simple. Next time, you launch the site within the editor, a content editor should be able to add these tags to components. The next part of the puzzle is getting access to these tags in the controller. In this example, I assume you will use a block controller. I will also assume you use a base controller. In our base partial controller, we're going to add a method to return the display option tag for every request. Using this pattern means that within any block controller, you will have an easy way to get the Tag:
This code uses two custom attributes. For completeness, the code for these attributes are included below:
The code uses a custom enum I've created called DisplayOptionEnum. One important thing to note is the BootstrapClassAttribute defined on each property which defines its associated, bootstrap class. We will use this when we're rendering our views:
Within any controller that inherits from the base class, it will have access to the GetDisplayOptionTag() method. I'm using enumsas, from previous experience, I find it makes life a lot easier to unit test rather than just working with strings. Lastly, it uses an extension method called GetAttributeOfEnumValue. The code for this custom extension method is shown below:
We now have access to the display option in our controllers. Next, we need to render the view 🖼️📷 🖼️
How To Use the Display Option Tag
One approach to pass the Bootstrap class to use within the view would be to define GetBootstrapClass() within the view model. Depending on how you have set up your project and your preferences will determine where this code will go. In this example, assume the method is on the view model. In the view you could access the class like this:
You can now use the GetBootstrapClass() method in your view to get access to the correct CSS class to display:
In each of your block controllers you need simply need to pass in the DisplayOptionTag into the view model, like this:
We've gone through quite a lot of code to get here, however, we now have a way to render different sized blocks based on a display-option set by the content editors. All the above code can be downloaded to a fully working website from my GitHub account here. #ILoveEpiserver. Happy Coding 🤘
