In this tutorial, you will learn about 6 great features that ship with Sitecore Rocks that will help you to improve your development workflow.
If you are new to Sitecore development and you have not heard about Sitecore Rock, I would strongly recommend that you check it out. Sitecore Rocks is a FREE Visual Studio marketplace plugin built for developers. Sitecore Rocks will allow you to perform a number of useful things within your Sitecore instance, without having to log into the CMS directly. Not having to log into Sitecore all the time will save you a lot of time 💥If you want to learn how to build a Sitecore website more efficiently, this is the tutorial for you 🔥🔥🔥
TIP: If you haven't installed Sitecore Rocks yet, I would suggest you read, How To Install Sitecore Rocks
Publishing A Sitecore Item And All Of Its Dependencies
If you can't use Team Development For Sitecore (TDS) on a project, try to remember everything that's included in a release that needs to be published, can be very annoying. There is nothing more annoying than adding a control onto a page and then it not rendering because you forgot to include something within the publishing cycle. Using Sitecore Rocks, you can publish an item and all of its dependencies from within Visual Studio! No more wasted time trying to track down content issues.
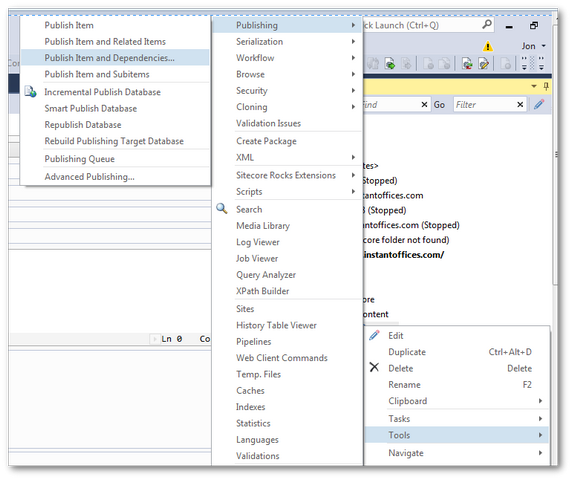
To publish an item and all of its dependencies using Sitecore Rocks, right-click on the Sitecore item you want to publish, and select this option from the context menu:
Tools ➡ Publishing ➡ Publish Item and Dependencies
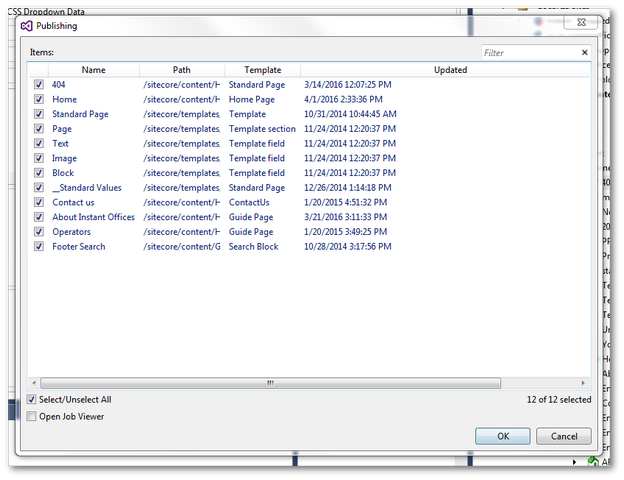
From here you will see a list of dependencies your layout is reliant on. You can now select what you want to publish and off you go. This tip alone has saved me hours of my life!
Clearing Your Sitecore Cache
Clearing the cache is a staple of web development. Sitecore Rocks ships with Cache Manager, a tool that will allow you to quickly kill your cache:
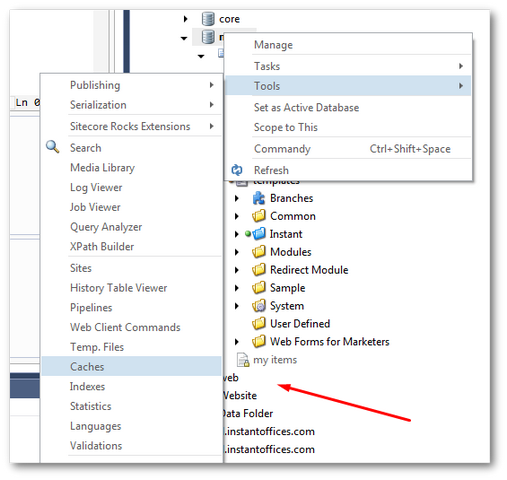
To access the Cache Manager, within Sitecore Explorer, open the Sitecore Rocks Context Menu and select:
Tools ➡ Caches
This screen should load:
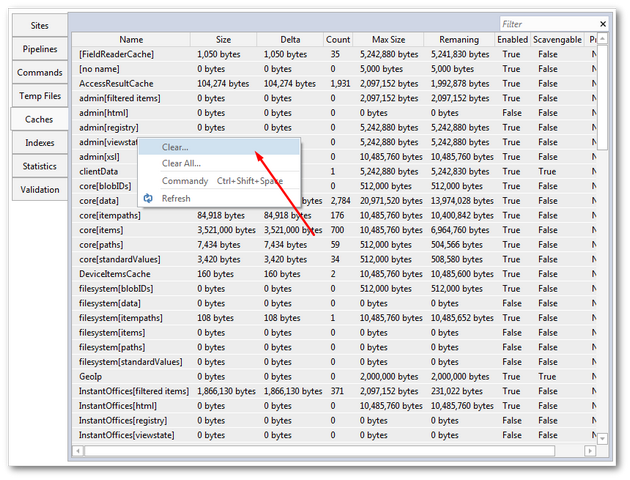
To clear the cache, I normally just select all items in the cache, by pressing Control and A (select all), right-click and select Clear All to wipe the cache. If you click on a single cache item, you can also use the Explore Cache option:
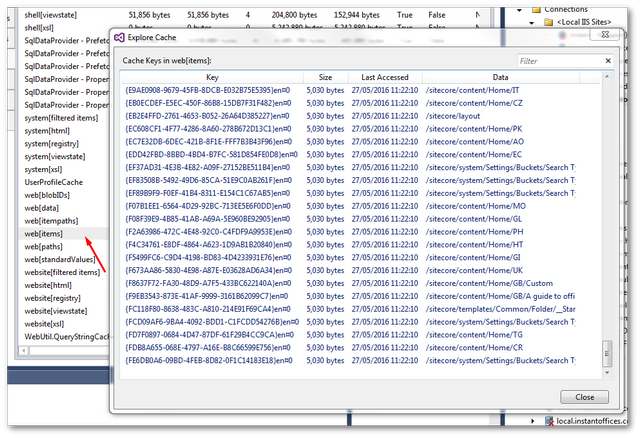
From here you can remove individual items from the cache, rather than blat the whole thing 😊
Package Management
If you can't use TDS on your project and you need to copy content from one environment to another one, you can use Sitecore's in-built Package Manager. Sitecore Rocks also ships with a package manager that can be used within Visual Studio. I've previously written about the Sitecore Rocks package manager here, How To Import and Export Sitecore Content. This is another great time saver and I recommend you check it out!
Adding Multiple Items
Within Sitecore Rocks, you can create multiple items of the same type at the same time! Being able to create content from within Visual Studio, will prevent you from making unneeded clicks within the CMS. Creating multiple items at the same time is very useful when creating dummy content for things like menus, blog pages etc.... To create multiple items using Sitecore Rocks, open the Sitecore Rocks explorer:
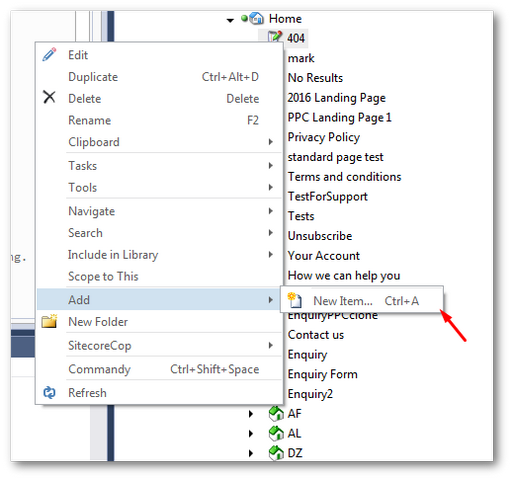
In the Sitecore Rocks explorer, select the location you want to create your page, bring up the context menu and select:
Add ➡ New Item
Here you can see a list of templates you can create. If you look at the bottom left-hand side, you can see an Add button with a text box to add in the number of items that you want to create:
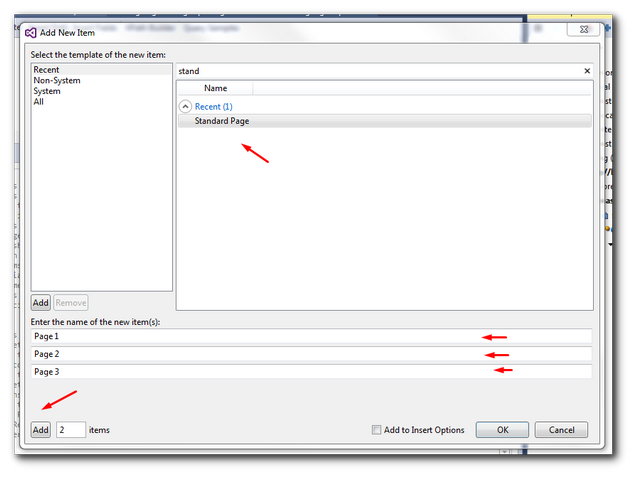
Add in the quantity you want and sit back and let Sitecore Rocks generate the items for you 💥
Viewing The Sitecore Logs In Visual Studio
Using Sitecore Rocks you can view the Sitecore error logs. The Sitecore error logs can be found in your website's data folder. When you try and debug errors, it can be annoying to have to tab between Chrome, IIS, Visual Studio, Windows Explorer and Notepad (or your IDE of choice). Instead, using Sitecore Rocks, you can view all the Sitecore log file information from within Visual Studio:
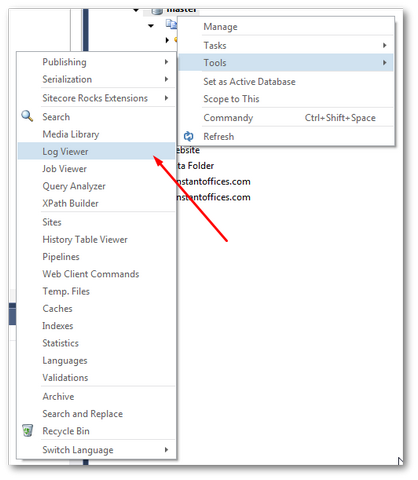
In Sitecore Explorer, right-click on an item to bring up the Sitecore Rocks context menu, select:
Tools ➡ Log Viewer
This should load the Log View screen:
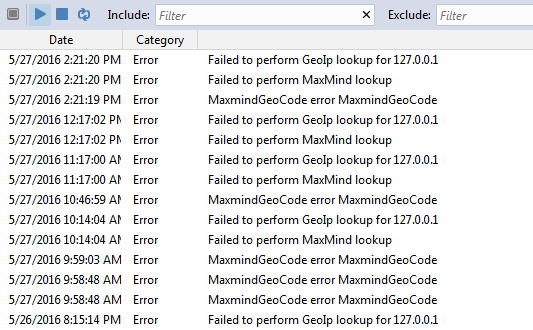
In the Log Viewer, you get a real-time view of the Sitecore logs. This means no more constantly refreshing your logs in Notepad! You can also filter the logs in Log Viewer to more easily find things. I find it useful to just show logs that were raised as errors when I'm debugging. using filter means no more hunting around the Sitecore log files manually ❤️
You are now a Sitecore Rocks master 🧘. You now know that Sitecore Rocks will save you a lot of time in development and is a must for any Sitecore developer. Sitecore rocks has a lot of features, including a lot that I haven't covered. The aim of this post is to try and show you why you should install Sitecore Rocks and I am hoping I have convinced you. Happy Coding 🤘
