In this guide, you will learn how to upgrade your Sitecore website to V9. Sitecore upgrades and usually painful. From my never experience, it's never been a case of clicking a button and everything magically works. Things go wrong. This is why in this guide I'm going to walk you through a real-world experience of upgrading Sitecore from version 7.5 to v8 and cover every issue I encountered on the path. Sitecore isn't always the easiest platform to upgrade at times, compared to some of the other CMS products on the market. Updating a Nuget package is a lot easier than some of the hoops you will need to jump through with Sitecore, but, 7.5 to 8 went pretty well from my experience of previous versions. Whenever you work with a Sitecore upgrade, it is vital that you start the right way, follow the right process and don't cut any corners.
The steps outlined by Sitecore are all there for a good reason. In the past, I've tried to skip a step here or there to save time and it's always bitten me in the ass and added more time to an upgrade. Before we go into the upgrade in more detail, I should point out that every solution is different and consequently every upgrade is different. What works and what went wrong for me might not work or occur in your upgrade. The best advice I can give is to start off with the Sitecore upgrade manual and then use guides like this as a real-world reference when you run into snags.
Getting The Files
In order to upgrade from Sitecore 7.5 to 8.0 you will need to head over to dev.sitecore.net and download a few files.
Sitecore 8 Upgrade Guide
Sitecore XP 8 upgrade package
Sitecore 8 Config Files and scripts.zip
Sitecore Update Installation Wizard 1.0.0 rev. 150619
Configuration File Changes
Sitecore 8.0 Installer
Back-up
Before you upgrade any Sitecore project, also make sure you make to backup all the things up 💾💾💾. Back-up the core, web, master and reporting databases. Back up your webroot. In life, things go wrong and they will... so making sure you can roll back your database and webroot will make your life a lot easier.
Install Sitecore Update Installation Wizard 1.0.0 rev. 150619
The first thing you need to do is install the 'Installation Wizard' package. In your Sitecore instance, go to the Sitecore desktop (www.website.com/sitecore/shell/). You can open the installation wizard, from
Start → Development Tools → Installation Wizard
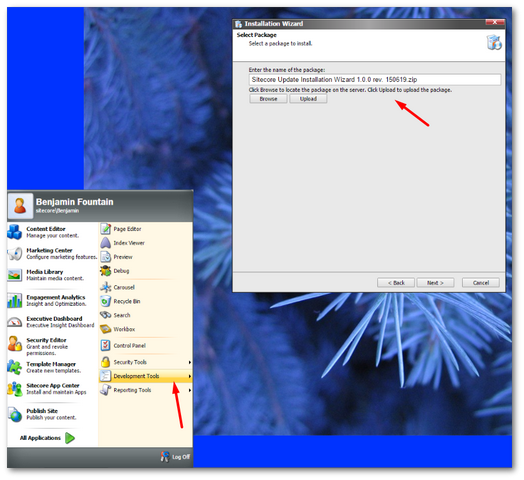
Select Sitecore Update Installation Wizard 1.0.0 rev. 150619.zip from your local hard drive, click 'Next' and follow the instructions to install it. You may need to override some of your existing files so click yes to overriding objects.
Run SQL Scripts
In Sitecore 8 Config Files and scripts.zip you should see two folders, the SQL scripts are in the Upgrade scripts folder. You will need to run a few scripts:
Core_80_UpdateTableLinksagainst the Core, Web and Master databasesAnalytics_80_PreInstallagainst the reporting databases. When you run the reporting script you will need to change the database name in the line below, to your local reporting instance:
Pre-Config Changes
In the web.config delete this line:
In Sitecore.Analytics.config, set Analytics.Enabled to false, like this:
Change the filename of Sitecore.Forms.config to Sitecore.Forms.config.disabled
Back-up your files
You have made a good process. It is at this point things can go wrong. To prevent from having to re-follow the steps listed above again, back everything up again! If you need to apply an upgrade to the production site later this tep will save you time!!!!!
Issues I Encountered
As mentioned, this is where things can go wrong
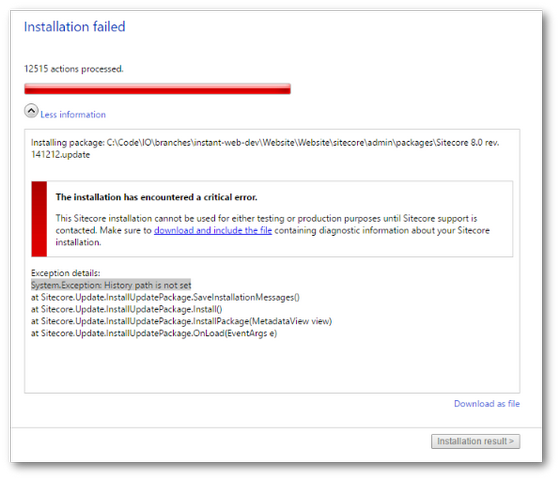
The first time I tried to run the installer I pretty much instantaneously hit this error 'History path is not set. This error was down to my stupidity and not following the offical installation guide properly. I hadn't installed the Sitecore Update Installation Wizard 1.0.0 rev. 150619.zip file first. After installing this patch, the installer happily carried on.
Install the Update
To install the update, log into your Sitecore instance and go to this Url:
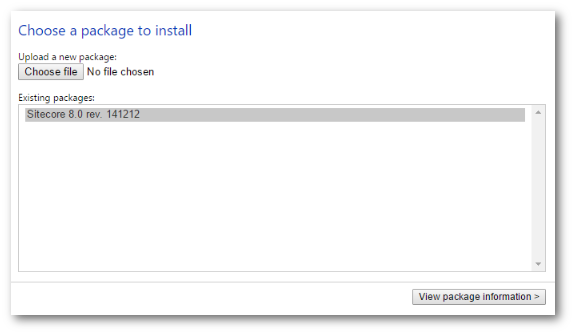
From the upgrade wizard, select Sitecore 8.0 rev. 141212.update from your PC and click View Package Information
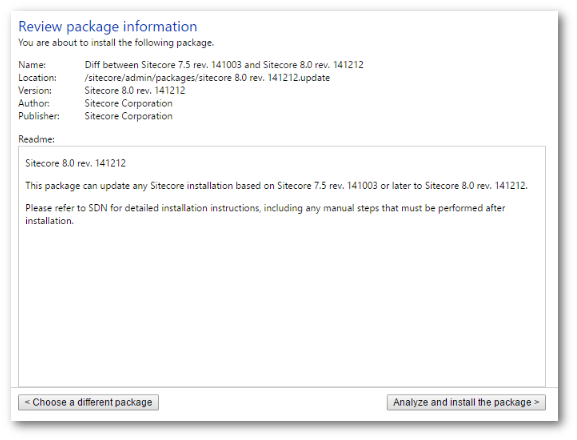
Click Analyze and install the package
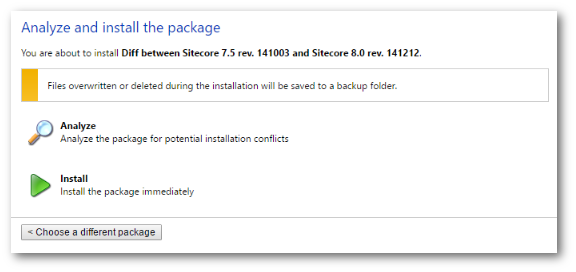
Click Install then sit back and wait! For reference, on my local dev machine, the upgrade took about 30 minutes to complete:
Back-up your files
If the upgrade went OK, it's time to back everything up again. This is probably my biggest tip, at each major step back all the things up ❗
Config Changes
The next step is adding config. In V8 you will need to add brand new configurations in several config files. When upgrading a site, I usually install a default Sitecore 8.0 instance on my PC as well. I can then use a tool like Beyond Compare, to compare the web.config and the config files in the App_Config folder and then use the tool to copy the new config required for the upgrade to work into my upgraded webroot.
The main config files that I need to update with the new config were:
web.configconnectionstring.configcommand.config
Everything else for this site was left as the default setting. If you have disabled any modules, like WFFM (by adding the disabled extension at the end of the filename), don't forget to revert everything.
NOTE: One new technology that was introduced in version 8, is PhantomJS. PhantomJS is used by the screenshot tool in the personalisation and testing modules. Make sure this is installed and working. This is a good time to do that!
Testing and Fixing
At this stage, your website should load and you should be able to navigate around your website and log into Sitecore successfully. At this stage I would recommend clicking links like the Experience Optimization and Experience Analytics buttons on the dashboard to make those tools are also working. If your site is using any additional modules like WFFM, then this is the time to upgrade them. Before running any upgrade, always remember to back everything up. Back-up is a boring mantra but it will save you hours, trust me 🤞
After any Sitecore installation or upgrade, you will need to rebuild your search indexes and link database. If you are unsure about how to do this then I suggest you read the following:
Also, do a smart publish on your homepage item 🔥🔥🔥
Sort Out Your Solution
After rebuilding your index and link data and publishing those changes, it might be time to sort out your solution. During the upgrade, if you had to manually hack any files, make sure they have been copied to the correct location. If you found you are not using certain files, like any old upgrade files, clean them. During my upgrade, I needed to copy a few of the new Sitecore binaries into a Libs folder. I also needed to copy configuration files, like the web.config and connectionstrings.config out of my web project and into my Sitecore build project. It's very easy to miss files and potentially override your newly upgraded files now. So... back up everything before you hit the publish button. You know you have finished when you can build your solution, perform a publish and the site works as expected afterwards. It's time to grab a beer and party 🎉🎉🎉
If everything has gone correctly, your site should now be upgraded and everything should be working as expected. No Sitecore upgrade will ever be the same, custom code, deployment processes, and project file setup will all dictate how you need to upgrade and influence what might go wrong. From my personal experience, one of the best upgrading tips I can suggest for you is to always follow the recommended upgrade path. If you get stuck, Sitecore support is always close at hand to help you figure out those annoying and obscure exceptions. If you encountered any other issues when upgrading from 7.5 to 8, leave a comment below. Good luck and Happy Coding 🤘
