Within this guide, you will learn everything that you will need to know in order to master the new Umbraco Management API with minimal headaches! The Umbraco Management API was released as part of v14 and it completely changes how developers extend Umbraco compared to previous versions.
Previously, you would have used either .NET or Angular to extend the backend, however, this is no longer the case. The Umbraco Management API is a collection of REST API end-points that exposes the same functionality that editors can do within the CMS. This includes tasks like creating document-types, properties, accessing logs, user, or member data, etc...
Within this guide, you will get access to everything you need to know in order to access and query the API, create custom end-points, as well as some options on how you can configure Umbraco to access the API in production!
Before we get to the good stuff there are some important things to consider:
The Management API is very dangerous as it will allow you to do CRUD operations on every facet of data stored within Umbraco. If a hacker could access your management API, they could destroy your website remotely just using Postman
The Management API requires authentication to access it. This authorization process is more complex compared to the access token method for the Content Delivery API
How To Setup Your Development Environment With The Umbraco Management API
To better understand what the Umbraco Management API can do for you, your first point of call should be the documentation. Within v14, you can access this documentation via Swagger within a browser. To access your sites local Swagger docs, add this URL within a browser while your site is running (change the domain to your localhost/Umbraco site):
An important thing to note about this Swagger documentation is that it is only available within development/debug mode. When you build your solution within Release mode, Swagger will be disabled by default. If you ever wonder why Swagger isn't loading, check the compile type!
Instead of trying to test the Umbraco Management API in a browser, the quicker way to test things out is probably via Postman (or alternative API platform). Setting up Postman is easy enough, asides from the authentication bit.
Adding the authentication settings definitely isn't as trivial as accessing the Umbraco Content Delivery API. To call the Umbraco Content Delivery API, all you need to do is define a token within appsettings.json and then add that token as a host header within a HTTP request. The added security for accessing the Umbraco Management API makes sense as the Content delivery API is read-only and exposes less dangerous end-points.
You will need to authenticate with the Umbraco Management API via OAuth. To validate with OAuth you will need to sign-in using your Umbraco CMS admin account via a call-back service. Configuring this type of authentication in Postman is a little more complex compared to adding an access token, but, its not that scary.
You can find, the step-by-step instructions on how to connect here, however, I will cover what you need to do below. For a quick reference this is what my auth settings look like:
First, add the URL of the Umbraco Management API end-point that you want to access within Postman. Next, go to the Authorization tab. From here select OAuth 2.0 and change the dropdown underneath it to Request Headers. Next, within the main windows scroll down until you find the Configure New token menu item. From here add these details:
Token Name: BackofficeSwagger Grant type: Authorization Code (With PKCE) Authorise Using Browser: Enabled Auth URL: https://localhost:44393/umbraco/management/api/v1/security/back-office/authorize Access Token URL: https://localhost:44393/umbraco/management/api/v1/security/back-office/token Client ID: umbraco-postman Code Challenge Method: SHA-256 Client Authentication: Send client credentials in body
Next click on the Get New Access Token button. This will launch the Umbraco sign-in page within a browser and log you in. The log-in process should then send a signal to Postman that everything is OK, however, be warned, this notification signal can fail which will hang the process.
The reason for failure is due to a pop-up. The post back launches a pop-up that my browser blocked first-time. If this happens, click the allow Pop-Up option in your browser usuall left to the URL and try again. If all goes well, you should get jumped back to Postman
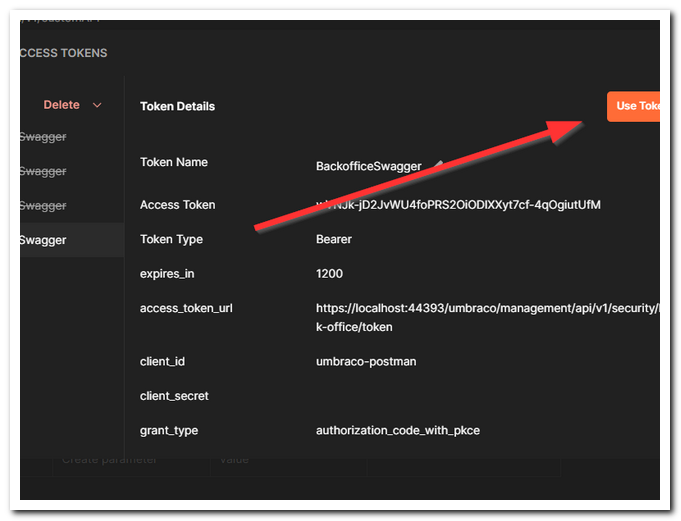
The final step is to accept the new token from the new modal that has loaded. You do this by clicking the Use Token button. I closed this dialog without reading it the first few times I was setting this up and then wondered why I couldn't authenticate and kept on getting a 401 error!
The final thing to note in this section is how to access the API. The prefix to all Management API end-point requests should be made to this URL:
Now you can access the out-of-the-box end-points, lets look at how to extend things with some custom end-points!
How To Create A Custom Endpoint Within The Umbraco Management API
In order to create a custom end-point, you will need to create a .NET controller. Within v14, you do that by creating a class and inheriting from a new controller type called ManagementApiControllerBase. The code to create this controller and end-point look like this:
After compiling your code, you can access this end-point using this URL:
Also it is worth noting, if you look within Swagger if you have followed the steps correctly, you should be able to see your end-point listed here (checking your API exists in this list can be handy for testing purposes):
How To Configure The Umbraco Management API In Code
When you are working in production, you might want a simple and quick way to access and test the data within the Management API, however, Swagger will be turned off. If you really want to, you can enable Swagger in production using this code:
In terms of security, this is not recommended, however, if you are still building a site then this can be handy!
Happy Coding 🤘