In this tutorial, you will learn how to build a simple search within a Umbraco CMS powered website. Umbraco, like a lot of CMS systems, decided against creating a custom search functionality from scratch. Instead, they implement one of the most widely used search providers available, Lucene. Lucene is a really powerful search library that is also super quick. If you Google search and Umbraco you will bump into Examine. Examine is a Umbraco specific wrapper for Lucene. This means when building a search in Umbraco, you interface with Examine and all the Lucene bits are taken care of for you. Simples! In this tutorial, you will learn how to implement Examine within your site 🔥🔥🔥
Where Are My Indexes?
Lucene uses a file-based indexing system. This means all the pages in your Umbraco instance are indexed and added to a corresponding Lucene index file. As content editors add new pages and update content, these Lucene index files are automatically updated. You can find these index files in:
App_Data ➡ TEMP ➡ ExamineIndexes'
Out-of-the-box, you should see two folders, Internal and External. The internal index is for all pages in the CMS, published, scheduled and save. The external index only contains the published public-facing pages. One common issue with the search is that the index might get outdated. You can force Umbraco to re-index your website and update the index in the CMS. Log into your Umbraco backend as an admin and go to the 'Developer' section. Click the 'Examine Management' tab:
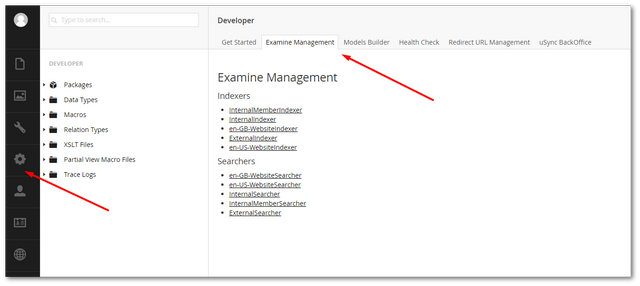
Under the Indexes section, you should see a list of Indexes that have been set up on your site. If you click on any of the indexes, you should see a Rebuild index button. Clicking on this button will generate that indexes 💥
How Are Umbraco Indexes Defined?
If you are wondering how these indexes magically appear on your website, then you can take a look in your Config folder (found in the webroot):
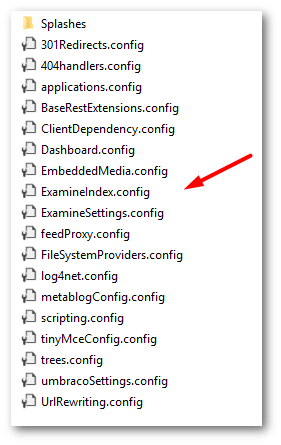
In here you will see two files called, ExamineIndex.config and ExamineSettings.config. If you look at both files, you should be able to see all the configs that define the indexes.
Custom Umbraco Indexes
Sometimes the default indexes are not quite right for your needs. Maybe you need to lock down an index by only exposing certain Umbraco document types, or maybe you want to create a search based restricted to a certain language that your site supports. The good news is, you can create a custom one!
To get started with a custom index, first, you need to define a custom indexset. An indexset is a configuration element you will need to add within the ExamineIndex.config file. An index defines all the doctypes and fields that will be included within the index. An example of a custom index definition is shown below:
The element might look scary at first, however, it's quite easy when you break it down:
SetName This is the name of the index (or alias in Umbraco talk). This is the name you will use in your code to reference the index
IndexPath Where the index will live on disk
IndexAttributeFields Defines the in-built Umbraco fields to include in the index
IndexUserFields The custom fields in your doctypes to include
IncludeNodeTypesThe doctypes you want to include
ExcludeNodeTypesThe doctypes you want to exclude
After defining what you want to include in your custom index, you need to register it with Umbraco. This is done in examine settings.config. Registering an index is done in a two-step process, first, by registering an indexer and then a provider. The code to register an ExamineIndexProviders is shown below.
This config needs to be added in this element:
ExamineIndexProviders ➡ Providers
Next, you will need to register a ExamineSearchProviders:
This config needs to be added in this element:
ExamineSearchProviders➡ providers
The most important part of this section is that the IndexSet property matches your index name that was defined in the ExamineIndexProviders. If you follow the steps above you should see the files populate on disk. The next step is to use it in code. The steps below will work exactly the same if you want to use the default indexes!
In the code above we use the ExamineManager to get access to Examine. Pass in the index name to select which index to query. Set a searchCriteria and pas in a search term. You can be build up detailed search queries by chaining commands. In this example, I will stick to performing a basic search. Lastly, you execute the query. This will return some search results. When Lucene searches and indexes, it will also rate how close a match a result is to the search term. Filtering with the most relevant results first is a pretty standard factor. This can be done by ordering the results based on the score property:
If you followed everything correctly, you should now have a custom index defined, you should be able to see the physical index files being generated on disk and you should be able to use Umbraco ExamineManager to search that index in your code. I'm hoping this guide covers everything you need to get up and running with search. Happy Coding 🤘
