In this tutorial, you will learn how to create a custom database logger for Log4Net and bundle it into a NuGet package so it can be re-used easily. In order to do this, you will need two class libraries. The first one is where the code for the logger will live. The second one is where the files for the Nuget project will live. These projects are named:
- Logger (Added Log4Net and Entity Framework via Nuget)
- Logger.Nuspec (Added a project reference to Logger)
In order to build NuGet packages, you will need two tools:
- NuGet Package Explorer
- NuGet.exe Command Line Bootstrapper (I install this in my System32 folder so it's in my command prompt)
Creating the custom table to store the log requests
The first step is to create a script to build the database. This script looks like this:
The difference between this script compared to the default script Log4Net provides to build a logging database is that I've added an extra column called ServiceId. My logger will be shared between a number of different APIs. The client wanted an easy way to distinguish between them. This custom column will involve some extra configuration tweaking of Log4Net though.
Configuring Log4Net to Log To A Database
As the end result will be a NuGet package and the code will live in a class library, I'm using an app.config for configuration. After you have added Log4net to your class library via Nuget, you'll need to add the following sections within app.config:
Things to note about the above:
You need to set the connection string to point to your database instance.
I have modified the standard database query to include an extra column called
serviceIDthat is of typeint. If you are implementing this code you might want to change or remove this column.The service ID will need to be configured within the Log4net config otherwise no data will be added within SQL
Creating the Logger
Now all the configuration has been set-up, it's time to write the code for the logger. The code is pretty easy, all we need to do is create a call that implements from ILog and ensure the service is configured correctly:
In the code above, a logger of type ILog is created. Using an interface means any calling code can be configured to use it easily using dependency injection. I'm also adding this serviceId column. On Line 27, I get a service unique identifier from a value in AppSettings. On Line 21, this parameter is set in GlobalContext. I use global context as the ServiceId value will be required on every request.
NOTE: If this code is not added, Log4Net will error saying the ServiceId parameter is a required database field.
We are now done with all the code required to define a Log4Net logger. The next step is to create the NuGet package. It would be a good idea you test all the code above before you wrap it into a package 🔥🔥🔥.
Creating the Nuspec file
In order to create a Nuget package, you first need to create a Nuspec file. If you use the Nuget command prompt, navigate to your NuGet class library from the terminal and then type:
Let us go over this configuration. I'm adding in log4net via NuGet. I'm adding in four files that will be run when the package is installed:
app.config.transform: Defines the configuration values you want to copy into the calling project
app.config.install.xdt: Applies transforms into the calling project during install. This provides you with more flexibility to do things like a find and replace, etc...
app.config.uninstall.xdt: The opposite of the install transform file, this transform will be run when the package is uninstalled.
The code!: This is pulled in via a project reference
Below shows my install and uninstall files. The only thing to note is that the config that checks if ServiceId already exists, the script will not add a duplicate key.
app.config.install.xdt
app.config.uninstall.xdt
Remember, after you finish tweaking your Nuspec file, remember to save it otherwise you'll lose your change:
File ➡ Save MetaDataFile
Adding Your Package to Nuget
As this is a private internal application, I don't want to simply add my package directly into Nuget public feed. Instead, I need to create a private feed. The simplest way to do this is to create a feed in a folder somewhere on your server and create a build script to copy your package there.
I'm not going into that part in this article so I'll show you how to create your package and add it into Visual Studio. In Package explorer with your Nuspec file loaded, click:
File ➡ Save
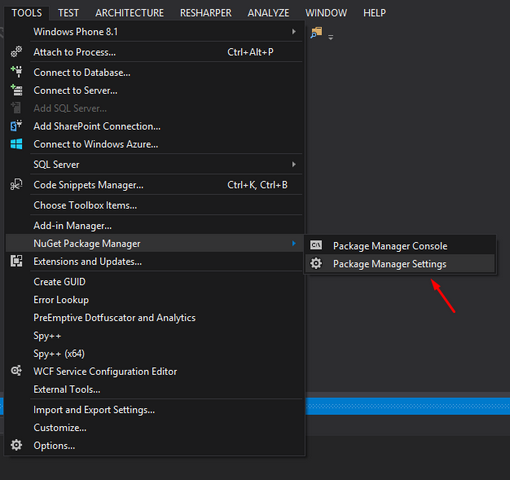
This will prompt you to create your package.. simple. Now in visual studio open:
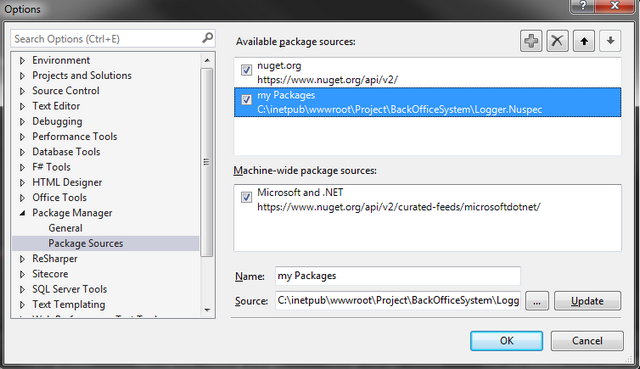
Tools ➡ Options ➡ Package Manager ➡ Package Sources.
From this screen, click the add button and use the ellipses to point to the area that you've saved your package.
The final step is to install the package in a calling application. Open a project where you want to use your custom logger. Right-click on the project and select 'Manage Nuget Packages'. The Nuget manager should now load and in the 'Online' section you should see your private feed (folder). On this screen, locate your package. Hit install 💥💥
Finally, it's time to test it. Below shows the code you'll need to implement the logger. Give it a try and you should start to see logs being output into your database:
Tip To Get it Working
Sometimes getting Log4Net to work is not all pain-free, here are some common issues that I have stumbled across when getting this working:
- When things go wrong, use the Log4Net debugging feature. This will show you where Log4Net is failing. It will output errors within your Visual Solution Output window. To enable debugging add the debug property in the log4net declaration:
Happy Coding 🤘