In this tutorial, you will learn how to apply transforms to configuration files within a Sitecore CMS project. Sitecore relies on a lot of configuration files in order for it to function. Every environment within your digital estate will need to be configured individually. For example, the connection string will be different in each environment. This means that when you deploy your code, you need to take configuration differences into consideration 🤔
In order to set your project up for success, understanding how to automate this process is important. Any deployment process that relies on a developer to manually apply the correct configuration changes during a deployment is sub-optimal. If your deployment process is reliant on a developer to apply certain config changes on every release, it is susceptible to mistakes and failure. Release processes that contain manual steps are notoriously buggy and error-prone. This is why understanding how to use transforms on configuration files is so important. If you want to learn how to automate your Sitecore deployment process like a BOSS, this is the tutorial for you 🔥🔥🔥
Sitecore Configuration Essential 101 Knowledge
When you are dealing with transforms and Sitecore, there are two topics you need to master. The first, is an understanding of how Sitecore configuration files are structured. Sitecore does not just use the ASP.NET framework web.config file as the central place to manage all settings. Instead, Sitecore relies on lots of smaller configuration files in order to work. These files can be found within your webroot in the App_Config folder.
Within a typical Sitecore project, it is very common for your project to contain over 40+ config files. When the application loads, Sitecore combines all these config files together to create one giant config file. The key thing to note is that Sitecore does this on application start. This mega config file can not be viewed within your solution. This is why transforms in Sitecore do not work the same as other .NET solutions 🤔
The second consideration around configuration management is around upgrades. As Sitecore upgrades are so complex, developers tend to use a different type of architecture within a Sitecore project. A Sitecore upgrade will involve updating lots of values and settings within a lot of your configuration files. To minimise the chance of upgrading errors, it is recommended to keep your web.config as simple as possible. It is a good practice to add custom configuration values as config includes in your App_Config folder. This separation will make the upgrade merge process as simple as possible.
File Replacement
A very simple approach for dealing with different configuration settings is to create a config file per environment within your App_Config folder. Using a third-party tool called TDS, you can even create a folder per environment and just duplicate all the configuration files within App_config within each folder and update them as needed. This way you can make sure the correct settings get transformed for the correct environment.
TDS is not free and requires you to purchase a license. More information about TDS can be found here.
TDS ships with a feature that will help you manage config transforms. When using TDS you create a TDS project per environment within your solution. To configure TDS to generate the correct configuration values for an environment, right-click on the TDS project for the environment you want to configure. This will launch the context menu. From this menu, select Properties. This should load the TDS Properties screen:
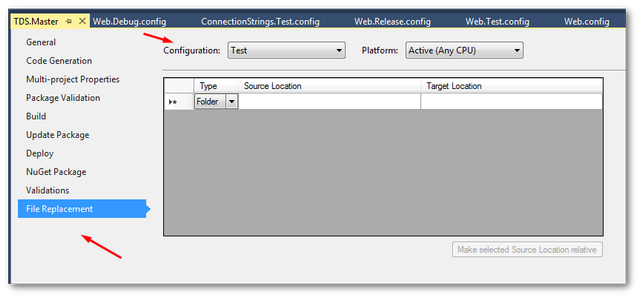
Click on the File Replacement option. From the screen that loads, you can select a configuration type, set a folder source location and set a target folder location. This approach will allow you to customize your config files per environment 😊
Transforms
The issue that I have with the technique above is duplication. Creating a config file per environment results in lots of files! Creating a configuration folder per environment and maintaining all those files is a major hassle. You will end up with more files to maintain 😞 When you need to upgrade you need to deal with 3 or 4 times the amount of files 😭
In software, I try to follow the DRY (Don't Repeat Yourself) principle on all aspects of development, so duplicating config files isn't that appealing. This is why transforms can make life a lot easier. Using transforms, you don't modify or change the original file. In this approach, you create environment based config files only when that file contains settings that are different. Within the environment-specific file, you just add the values you want to override. As the changes are stored outside of the original file, this passes the upgrade requirement of not modifying the web.config or the other configuration files too much. This also means less duplication 😊
In order to use transforms like this on a day-to-day development basis, you will need to generate the correct file each time you make a change and want to run the site. To do this within Visual Studio out-of-the-box means a developer would have to use web deployment in order to do the transform.
Again, we can also use TDS to do this. As of version 4 of TDS, config transformations have been included within the TDS deployment process. This is a great capability, as it means you can deploy your solution completely with TDS and not have to go via web deploy or any other external program.
This means you can use Visual Studio out of the box with something like Slow Cheeta. If you haven't used Slow Cheeta , more information can be found in Configuring SlowCheetah to transform your web.config in your MSBuild script. Using TDS 4 means you can now perform transforms on your Sitecore include files as well 💥.
Crash Course In Transforms
The first step is to install Slow Cheeta. Installation is simple via NuGet. Open Visual Studio and right-click on your solution from within Solution Explorer. Select Manage NuGet Packages For Solution:
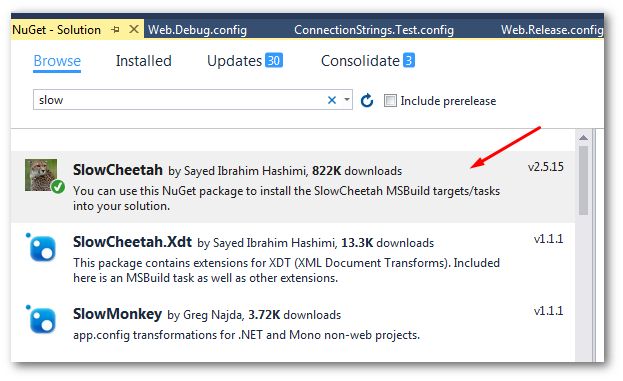
Go to the Browse tab and search for 'SlowCheetah'. Locate the package and install it against your web project:
Next, you need to install the SlowCheeta Visual Studio extension. You do this from the Visual Studio marketplace. To access the marketplace, within Visual Studio go to:
Tools ➡ Extensions and Updates
This will load the marketplace browser:
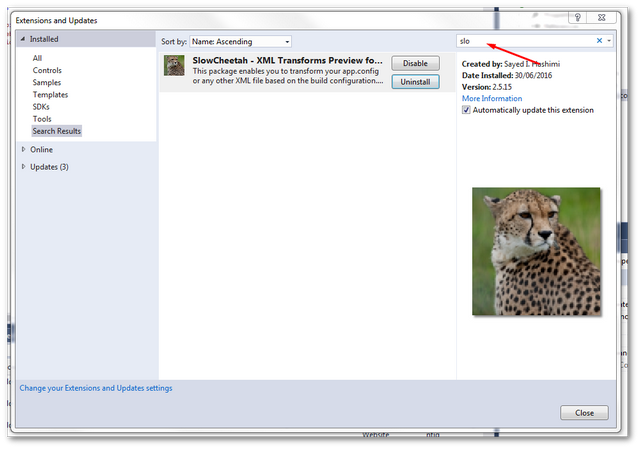
Search for SlowCheeta, locate it and click the Install button. You are ready to start transforming:

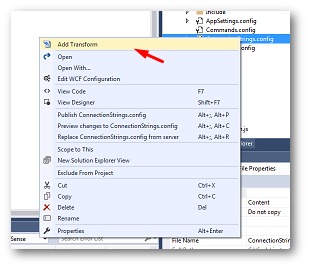
In your App_Config folder, right-click on the config file that you want to perform a transform on and select Add Transform. This will add in variations for each deployment environment you have configured within Visual Studio (default is Release and Development):
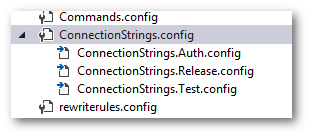
Here you can now add in your transforms. Below lists some of the more standard transforms XML snippets that you will need to use:
Replace on a name: This will swap the XML in the source file with the XML in this file:
Replace on a key (App Setting): This will replace an app setting:
Inserting: This will insert the XML into the original file:
Happy Coding 🤘
