In this tutorial, you will learn how to create a custom gutter item within Sitecore CMS. Gutter items allow you to give extra feedback to content editors about items within the Sitecore tree. Below you will learn how to build a custom gutter item that displays the items published state. This custom gutter can really help the content editors workflow. If you want to learn how to build a custom gutter, or you simply want to know how to add an items published state within the CMS, this is the tutorial for you 🔥🔥🔥
Steps Required To Build A Customer Sitecore Gutter
Making the content editors' lives as easy as possible should be a key priority on any project. Content publishing wise, it is very difficult to know which Sitecore items have been published out-of-the-box. Following good content editing practice, when you need to publish some new work, you want to minimise what content you publish. When you are unsure if your content is published or not, your only option is to perform a site-wide smart-publish. This is not ideal as you might make something live that does not ready yet 🤔
To get around this annoyance, we will add a published status in the CMS. This will mean a content editor will be less likely to have to rely on a site-wide smart publish. The way we will do this is to create a custom gutter. First up, I'll cover the code to render the published status next to an unpublished item:
To make a custom gutter, you will need to inherit from GutterRenderer. You will need to override GetIconDescriptor(). Within this class, you can then add the gutters custom logic. In this custom gutter, we need to get all the publishing targets defined within your Sitecore instance. This is done using this code:
Next, we check if the item has been published to the publishing database. In the majority of cases, this will just be checking that the item lives in the web database. I've added an extra check in case you have more.
If the item is only published in one of the publishing environments, a yellow dot will be applied to the item and a tooltip value set to Not Published On All Targets. As the code iterates through the publishing targets. If the item has been published, the PublishedState will be set. If PublishedState is true, the gutter code returns null. Returning null will mean that no gutter item will be rendered against this item.
If the item isn't published, a 'GutterIconDescriptor' item is returned with the appropriate message. One thing to note is the line with this code:
Click = string.Format("item:publish(id={0})", item.ID)
This means that when a content editor clicks on the red dot in the content editor, the published dialogue for that item will open. This shortcut will speed up the content editing process 💥
With the code defined, we need to enable the gutter within Sitecore 😊
Enabling the Publication Status Gutter
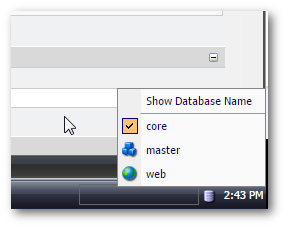
Go to the Sitecore Desktop and make sure you are working against the Core database (see this tutorial if you are unsure how to do this):
After you point your Sitecore instance to work off of Core, go to the content editor :
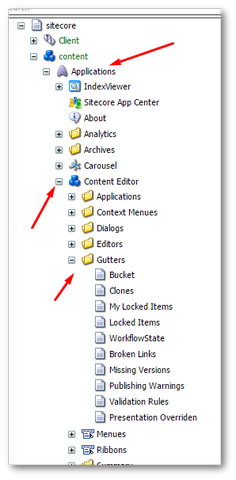
You will need to create a new Gutter object. This object will need to point to the custom class we created above. To do this, navigate here:
The screen should look like this:
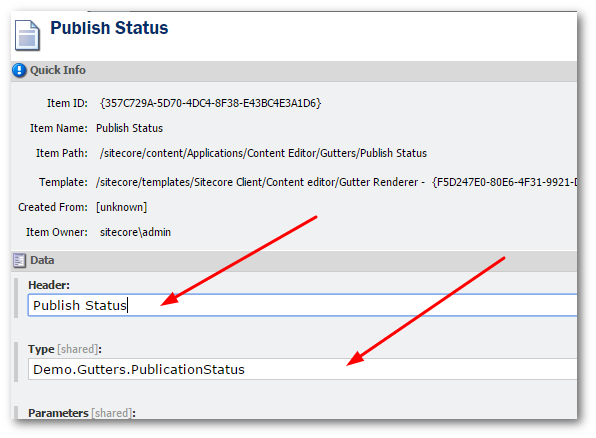
To create a new gutter, you need to set two properties. As a quick move, I normally duplicate an existing gutter item and then modify it. The choice is yours. Call the gutter something like Publish Status. In the properties of the item, set:
Header: The value that you want to appear in the Gutter Context menu and the type.
Type: This is the namespace and class name of the class that contains the custom gutter code. Note, you do not need to add the assembly name here!.
Save the item and go back to the Sitecore desktop. Switch the database to master. You should see your custom gutter item in the gutter context menu (right-click on the left grey toolbar).
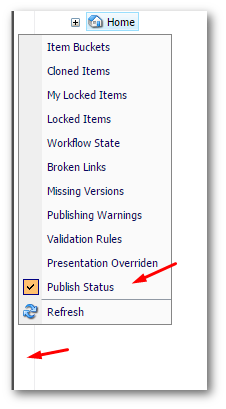
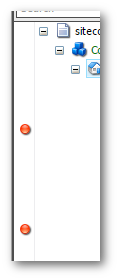
If you enable 'Publication Status' you will now see a red dot against an unpublished item and a yellow dot against semi-published items. If you click on the dot you should see the items published dialogue.
You now know how to create a custom gutter in Sitecore CMS. I recommend you give yourself enough time to make these editor improvements within your project. Creating a custom gutter to allow a content editor to see the published status next to an item in the Sitecore editor s a good example of how a little effort from your part can make your teams more productive. Happy Coding 🤘